DIY MAKE UP ORGANIZER
BY: ANGELOU AQUINO
Acrylic, wooden, and other comercially-available makeup organizers can be costy, so why bother spending a lot if you can make your own customized one for less?
Materials needed:
-pancake box (or any box that you have in any size)
-bond paper
-scissors
-adhesive (glue stick, white glue, or tape)
-ruler
-lipstick (optional)
Procedure:
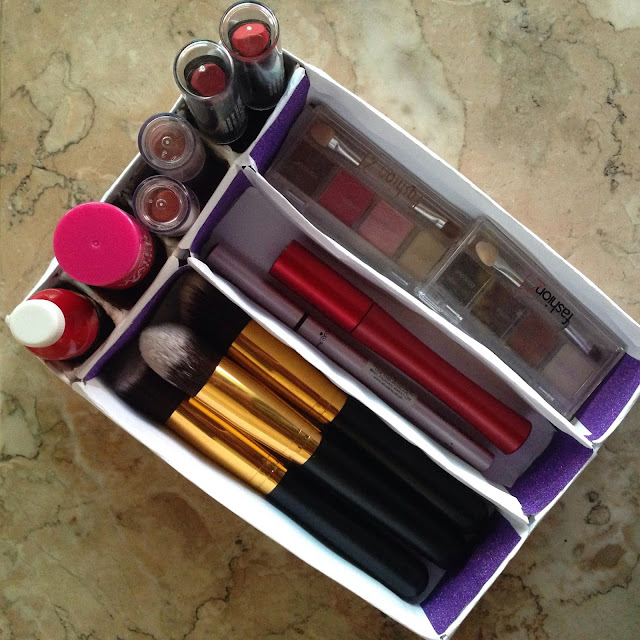
1) Have your box look like a tray. If you are using a shoe box, you can skip this step because all you need to do is to remove the cover. Since I used a pancake box, I still had to cut an opening in one side (not the side you open for the pancake mix but the front) and tape the other opening so that it will look like a tray.
2) Cover your box with any design you desire (include the inside part). I chose to cover mine with plain white bond paper and leave kiss marks for my style.
3) Cut strips from the part of the box you removed (this is the one I cut from the front) or from the cover of your box. The size will depend on how big your box is. Cut as many as you need as a divider.
4) Assemble the strips inside the box. Make sure you have vertical and horizontal strips because this will be your divider for lipsticks, brushes, and other items you will put in your organizer. TIP: Cut slits into the horizontal strips that will let you crisscross those dividers. Check this video to see: https://m.youtube.com/watch?t=3s&v=D0WoXNNcbSc
5) Finalize the design. I covered the rough edges of mine with bond paper and put some glittery sticker paper.
And we're done! You can now have your little makeup collection organized.


Acrylic, wooden, and other comercially-available makeup organizers can be costy, so why bother spending a lot if you can make your own customized one for less?
Materials needed:
-pancake box (or any box that you have in any size)
-bond paper
-scissors
-adhesive (glue stick, white glue, or tape)
-ruler
-lipstick (optional)

Procedure:
1) Have your box look like a tray. If you are using a shoe box, you can skip this step because all you need to do is to remove the cover. Since I used a pancake box, I still had to cut an opening in one side (not the side you open for the pancake mix but the front) and tape the other opening so that it will look like a tray.
2) Cover your box with any design you desire (include the inside part). I chose to cover mine with plain white bond paper and leave kiss marks for my style.
3) Cut strips from the part of the box you removed (this is the one I cut from the front) or from the cover of your box. The size will depend on how big your box is. Cut as many as you need as a divider.
4) Assemble the strips inside the box. Make sure you have vertical and horizontal strips because this will be your divider for lipsticks, brushes, and other items you will put in your organizer. TIP: Cut slits into the horizontal strips that will let you crisscross those dividers. Check this video to see: https://m.youtube.com/watch?t=3s&v=D0WoXNNcbSc
5) Finalize the design. I covered the rough edges of mine with bond paper and put some glittery sticker paper.
And we're done! You can now have your little makeup collection organized.


Comments
Post a Comment