DIY SCENTED SLIME
BY: FRANZ WILLARD DOMOGEN


Problem:
-
Commercial slime content is uncertain which imposes threat to children, especially if mercury content in included in its structure.
-
Slime at a large quantity is costly since most commercial slime products are sold at a certain content only—often lesser than 1oz.
-
Playing with slime is satisfying and refreshing; small quantity of it isn’t enough.
Objectives:
-
Make a DIY slime product with the use of household remedies.
-
Use it as an activity to engage children to be innovative and creative in making their own slime toy. (My sister helped me do it.)
-
Submit as a requirement for Contemporary Arts.
Uses:
-
For entertainment.
-
Can be used as a cleaning aid for hard to reach spaces like laptop keyboards.
-
Can be moulded into saturated objects that can be used for realistic representations.
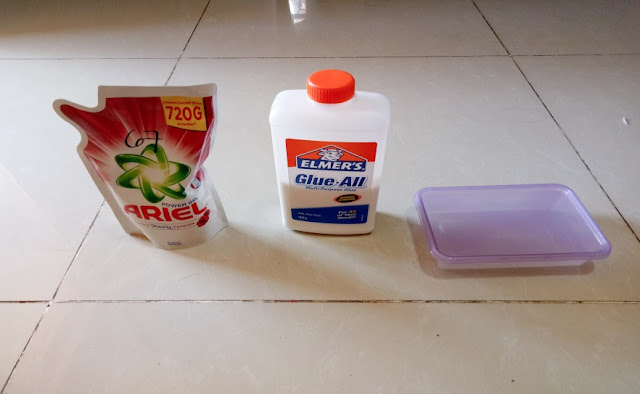
Materials
Needed:
-
A cup of glue.
-
Liquid detergent.
-
3 table spoons of water.
-
1 medium sized container.
-
Food coloring of choice.
-
Spoon/Stirrer.
Procedure:
-
Prepare the materials.
-
Pour the cup of glue into the container. Take note that the more amount of glue that you put, the bigger the quantity of the output will be.
-
Add around three table spoons of water into the glue and mix it with a spoon or a stirring rod. Stir the mixture until the texture is balanced.
-
Slowly pour the liquid detergent to the mixture while continuously stirring. In this stage, lumps will form out of the mixture. The moulding process will start from here on.
-
Continuously stir the mixture while adding the detergent. Once the mixture totally solidifies, you may use your hands to knead, stretch and compress it like dough. Knead in a clean surface to avoid dirt sticking to the slimy clay.
-
Once the texture of the massaged and stretched product is balanced—no air pockets must be left be—you may add the color of food coloring of your choice and massage it again to spread the color. Two drops will be enough, and if you wish for a darker shade, you may add more after spreading it into the solid slime output.
Note:
For the scent, you may use a plain detergent, however, the one used
in this had an infused scented fabric softener. If so, add around
half a table spoon of fabric conditioner of your desired scent into
the mixture along with the water on procedure number 3.

Prepare
the materials.

Pour
the cup of glue into the container. Take note that the more amount of
glue that you put, the bigger the quantity of the output will be.

Add
around three table spoons of water into the glue and mix it with a
spoon or a stirring rod. Stir the mixture until the texture is
balanced.

Slowly
pour the liquid detergent to the mixture while continuously stirring.
In this stage, lumps will form out of the mixture. The moulding
process will start from here on.

Continuously
stir the mixture while adding the detergent. Once the mixture totally
solidifies, you may use your hands to knead, stretch and compress it
like dough. Knead in a clean surface to avoid dirt sticking to the
slimy clay.

Once
the texture of the massaged and stretched product is balanced—no
air pockets must be left be—you may add the color of food coloring
of your choice and massage it again to spread the color. Two drops
will be enough, and if you wish for a darker shade, you may add more
after spreading it into the solid slime output.

Finished
Output. Your DIY Scented Slime.


Comments
Post a Comment